Growing cucumbers in a bottle allows you to effectively carry out this procedure both on the site and at home. But there are several rules regarding the preparation of containers and seed, as well as basic plant care, which must be familiar with in order to provide cucumbers with suitable conditions for growth and development.
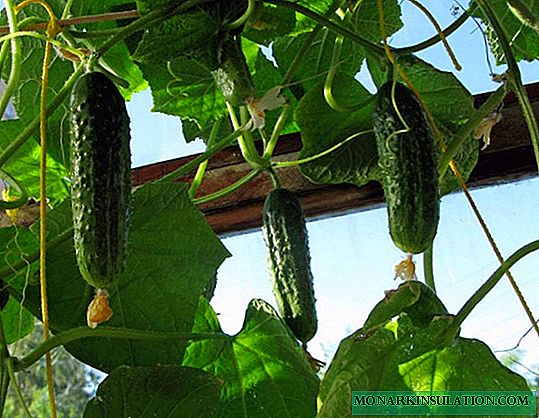
Growing cucumbers in five-liter bottles at home
Planting cucumbers in plastic bottles has many advantages: firstly, such containers are compact and convenient to place indoors, secondly, the earth in transparent plastic heats up well, which positively affects the root system of your plant, and thirdly, such The method is well suited for an early harvest. But there are some minor flaws. Bottles, unlike containers and crates, are usually used once, so the next year you will have to stock up on them again. Also note that one bottle is designed for only one plant, and if there is not enough space on your balcony, then it will not work to grow many bushes.
Seed preparation
Since the growing conditions of cucumbers on the balcony are close to greenhouse, cucumbers should be sown in mid-April. It is also advisable to choose self-pollinated varieties (April F1, Zozulya F1, Emelya F1, Matilda F1).
- Warming up. For a month before sowing, keep the seeds in a warm place at a temperature of + 25aboutFROM.
- Disinfection. Prepare a bright pink solution of potassium permanganate (mix 1 g of powder with 200 g of water) and place the seeds in it for 20-25 minutes. Then remove, rinse in clean water and dry a little on a napkin.
- Soak. Put a moistened piece of cloth on the bottom of the container or plate, place the seeds on it and cover them with a second moistened piece of cloth. Remove the workpiece in a warm place for 2 days, making sure that the fabric does not dry out.

To ensure better germination of the seeds, they must be processed before sowing.
If you bought seeds, then carefully study the packaging: many manufacturers themselves carry out the necessary seed treatment and indicate this. If you find such a mark, then only soak.
Sowing seeds
For growing, you will need five-liter bottles. 3-5 seeds can be sown in each bottle, but, as mentioned above, you will need to leave 1 the strongest shoot. You can remove unnecessary sprouts when 2-3 real leaflets are formed on them.
- Cut off the top of the bottle 4-5 cm below the “shoulders” and make drainage holes at the bottom.
- Pour 4-5 cm of drainage material (small gravel, eggshell, sphagnum moss, etc.).
- Fill the bottle with soil, not reaching the top edge of 2-3 cm. You can take a ready-made universal vegetable mixture, but it is advisable to prepare the soil yourself: mix garden soil, compost, peat and sawdust in equal parts. It is also recommended to add ash to the soil (0.3 tbsp. L / kg of soil).
- Moisten the soil and make 3-5 cm deep holes in it.
- Gently place in them 1 seed and sprinkle.
- Moisten the crops slightly with a spray bottle, cover with the cut-off top and place in a warm, bright place.
- You can transfer bottles to the balcony when the temperature on it is equal to +22aboutC - +25aboutFROM.

To make a "greenhouse", you need to remove the bottom of the bottle or make holes in it and cut off the top
You can also sow the seeds first in separate containers, and then transplant into a bottle when the sprouts form 2-3 real leaves.
In order to get ordinary seedlings and then place it in open ground under a bottle, do the same, but sow in separate containers (peat cups are good) with a volume of 150-200 ml, and then cover them with a film. Sowing date is mid-April.
Video: growing cucumbers in a bottle
Further care
To provide cucumbers with good conditions, it is necessary to perform several simple care procedures.
Watering
It is carried out according to the following scheme: water the young seedlings under the age of 20 days 1 time in 2 days, in the period before flowering - 1 time in 5-7 days, and then every 3-4 days. In this case, it is necessary to use only warm (heated in the sun) water. Plants should be watered under the root, avoiding moisture on the leaves. After each watering, do not forget to gently loosen the soil to avoid crusting and to provide the roots with access to oxygen.
Ventilation
Try to ventilate the crops 2 times a day for 10 minutes, slightly moving the cover or film. Also remove condensate in a timely manner. It will be possible to completely remove the covering material immediately after emergence.
Lighting
Cucumbers are light-loving plants, so try to find a place with good light on your balcony. But keep in mind that direct sunlight at high temperatures can harm your landings, so in such cases it is advisable to shade them.
Pollination
If you have selected a non-self-pollinating variety, then you will have to carry out this procedure yourself. To do this, carefully inspect the bush and find female flowers (they are located on a small green seal) and male flowers. Carefully tear off or cut off the male flower and remove all the petals so that only the stamens remain, and then gently sweep them several times over the central formation in the female flower. Some gardeners do even easier: they collect pollen with a cotton swab, and then transfer it to the right place.

Female flowers of a cucumber are located on small seals
Top dressing
Since your plants are in containers with a limited amount of soil and therefore can not get a lot of nutrients from it, they will definitely need to be fed. For all the time you need to spend 5 root dressings of your plant:
- The first feeding is carried out at the beginning of flowering. Ingredients: urea (1 tsp) + superphosphate (1 tsp) + potassium sulfate (1 tsp) + sodium humate (1 tbsp.) + Water (10 l).
- The second feeding is carried out 10-12 days after the first. Composition: potassium sulfate (1 tsp.) + Sodium humate (instead of it you can take the nutritional composition Ideal, Fertility, breadwinner - 2 tbsp.) + Water (10 l).
- The third and subsequent top dressings have the same composition as the second, and are carried out 1 time in 10-12 days.
Do not forget that it is necessary to add nutritional compounds to previously moistened soil.
In addition to root dressing, spraying will also be useful for cucumbers:
- The first feeding is carried out at the beginning of flowering. Composition: urea (1 tsp) + water (1 l).
- The second top dressing is carried out at the beginning of fruiting. Ingredients: urea (1/3 tsp) + water (1 l).
- The third top dressing is carried out with a decline in productivity. Composition: urea (1/4 tsp) + water (1 l).
Bush formation
This activity includes garter, pinching and pinching.
- Garter. For balconies it is convenient to use a grid with large cells, placing it next to the bottles, or a rope trellis. To make it, a rope is horizontally stretched horizontally under the ceiling, and then vertical bundles are attached to it (do not forget to fix their free end, for example, by tying it to a small peg stuck in the ground or by carefully attaching a loop on the stem itself at a distance of 15 cm from the soil level). The height of the supporting structure must be at least 1.5 m. It is necessary to build it by the moment when the plant reaches 20 cm in length and antennae and about 7 leaves appear on it.

At home, a grid with large cells can perfectly serve as a support for a cucumber
- Pinching and pinching. Stepsoning is the procedure for removing lateral processes (stepsons). The processes that are formed in the sinuses of 5-6 leaves, counting from the bottom, are subject to removal. Do not delay with carrying out this work: stepsons must be removed until their length does not exceed 3-5 cm. Experienced gardeners are also advised to break all the ovaries located in the sinuses of the first 3-4 leaves.


It is necessary to remove all stepsons in time, otherwise the amount of yield will greatly decrease
After you have done stepsoning, start pinching.
- At a height of 0.5 m, cut the lashes so that 1 ovary and a few leaves remain on them.
- At a height of 0.5-1 m, leave 3-4 lashes. On each of them should be 2 ovaries and several leaflets. Remove excess length.
- Do not remove the shoots on the next 0.5 m, but cut them so that 3-4 ovaries and a few leaves are left on each.
- At a height of 1.5 m, cut the central shoot to stop its growth.

Pinching is an important part of forming a cucumber bush
Harvesting
As a general rule, you can collect cucumbers at different stages of their ripening - this is true for both open and protected ground. At home, getting a large amount of the crop is difficult, so decide in advance how you want to apply it later, and pick the cucumbers when they reach the size you need.
- For fresh salads and salting - fruits that have reached a length of 10 cm or more.
- For canning - fruits that have reached a length of 8-10 cm, sometimes 3-4 cm.
It is better to collect cucumbers in the morning or in the evening (it is believed that it is at this time that the greenery is the most elastic and strong), carefully cutting the stem, so as not to damage the lash. As a rule, they harvest 1 time in 2 days. It is not recommended to neglect the terms, because in this case the quality of the fruit decreases (the skin coarsens, yellowness appears, etc.) and the number of new ovaries decreases, as the plant spends energy on the development of already formed fruits. At home, it is difficult not to notice Zelentsy, but it is advisable to pay attention to shoots located in uncomfortable places (for example, under the ceiling).
The use of plastic bottles for growing cucumbers in the open field
In order to provide cucumbers with good conditions for growth, it is necessary to responsibly approach not only the planting itself, but also the selection and preparation of the site.
Site preparation
For a cucumber, it is better to choose a place with light sandy loamy or loamy soils, groundwater should lie at a depth of 1.5 m. If you want to plant cucumbers on a bed, then try to pick up a sunny and sheltered area. When planting cucumbers, it is recommended to take into account crop rotation: this crop grows well where potatoes, tomatoes, onions, cabbage and green manure (alfalfa, clover, rye, mustard, etc.) were previously placed, and plant the cucumbers again in the same place after pumpkin (pumpkin, watermelon, squash, squash) is undesirable.
It is better to prepare the site in the fall, but it is also allowed in the spring, approximately 3 weeks before planting. For this purpose, add organic matter for digging (rotted manure, compost or humus) - 6-8 kg / m2 and mineral complex - ammonium nitrate (15 g / m2) + superphosphate (40 g / m2) + ash (200 g / m2) or potassium salt (25 g / m2).

Before planting cucumbers, the soil on the bed needs to be improved
If there is a need, then 10-12 days before soil improvement deoxidize it by adding slaked lime for digging (200-300 g / m2) or dolomite flour (350-400 g / m2).
Signs of acidic soil are the abundance of moss or horsetail, light plaque and rusty water in the pits.
If you prepared a bed in the fall, then dig and loosen it before planting, and then form a bed. If you fertilized the soil in the spring, then it will be quite shallow to dig the site with a pitchfork, loosen it, and then form a bed.
Ways to use plastic bottles when planting cucumbers
As a rule, shoots are planted in the soil at the age of 20-25 days, that is, at about the end of May. At this point, they should have 3-4 real leaflets. In addition to deadlines, consider the quality of the soil: if you have not improved the soil, then when planting, add 0.5-0.7 kg of humus or compost and 1/5 cup of ash to the bottom of the pit, and 0.15-0 to the bottom of the hole, 2 kg of organics and 2 tbsp. l ash and moisten.
Landing with a bottle
- In the prepared soil, dig a hole of such a size that a bottle fits in it. Note that the soil in the bottle should be level with the soil on the bed.
- Carefully remove the bottom of the bottle and place it in its pit.
- Fill the empty space between the walls of the pit and the walls of the bottle with earth to give it stability.
- Gently moisten the plant under the root.
To subsequently make it easier to cut off the bottom, many gardeners pre-make 2-3 horizontal cuts in each bottle wall, 2-3 holes at a height of 1.5-2 cm from the bottom, and then drainage material and soil are poured.
Fit in a plastic rim
In this case, you need to use seedlings prepared in separate containers.
- In the prepared wells, place the sprouts with a lump of earth or a peat cup.
- Sprinkle with soil and water.
- Remove the top of the bottle by the shoulders or 2-3 cm below and the bottom.
- Place the resulting rim around the sprout and push it 3-5 cm into the ground.
- Place the sprouts under the covering material.

The plastic rim serves as a good protection against pests.
Gardeners with experience in using bottles for growing cucumbers say that the plastic rim helps protect the plants from the bear, reduce the number of weeds directly in the bushes, and save water when watering, because the water will be within the fence, and not spread over the surface.
Cap fit
If you do not have the opportunity to provide sprouts with temporary shelter in the first 5-7 days after planting, then you can very well use a cut-off "funnel". Some gardeners prefer a more spacious version of the “greenhouse” and remove the bottom of the bottles.
- In the prepared wells, place the sprouts with a lump of earth or a peat cup.
- Sprinkle with soil and water.
- Carefully cover the sprout with a cap, pushing its edges 3-4 cm into the ground. Also remember to remove the cover.

Five-liter bottles are often used as temporary shelter.
Video: how to plant cucumbers under the hood
Care Features
Care measures are almost the same as those recommended for home growing, but there are several features:
- Instead of sodium humate, in the first feeding, use chicken droppings (1 part organics per 15 parts water), for the second and subsequent - mullein (1 part organics per 6 parts water).
- If you grow cucumbers in a greenhouse, then arrange ventilation after each watering.
- Do not forget to mulch the planting. Sawdust or straw sprinkled with a layer of 5 cm is well suited for this purpose. Also, from time to time, the mulch layer needs to be updated.
- Weed the bed regularly.
- Store the harvest in a cool, dark place. If there is a need to cover it, then use burlap or a cotton cloth, not a film.
As you can see, putting cucumbers in a bottle is not a difficult thing, and you can completely cope with it even in the absence of experience. Carry out all the work on time and do not neglect the care of your plants, and you will be able to get a good harvest both at home and in the garden.